前言
从 tui.editor 中生成支持定位的 TOC 目录
最近由于 AI 的火热,公司的一个外包项目上要集成一些 AI 的功能。
其中有一个模块是和富文本和 md 编辑器相关的, AI 用来生成主题,标题之类的,说白了对前端来说就是调接口😂。
我是一直觉得 AI 颠覆生产力,开始第三次工业革命有点太扯了。不过这也是我个人狭义的观点。
扯远了,项目要求中要支持对 md 编辑器内容生成 TOC 目录并且支持定位。
首先要做的就是选型了,毕竟外包一个项目,是不可能给你手搓一个 md 编辑器的,咱也做不到。
经过调研之后(其实就是 github 上搜了搜),选择了 tui.editor 作为核心的 md 编辑器。
很不幸,它不支持 TOC 的显示,我上它的仓库查了查,有人提了这个 issue ,官方也确定这个功能在路线图中,但是目前并未实现。
没办法,我们只能从其他方面入手了,所以本文会以一种直接检索 dom 的方式了生成 toc 目录。如果你了解原生 dom 操作的基础 API ,那么你应该能很容易理解。
正文
什么是 TOC
TOC ,全称 table of content ,中文中我们称之为文章目录,在本页面的左侧,你就可以看到这个称之为 TOC 的东西。
搭建一个 tui.editor 页面
我们先搭建一个 tui.editor 的页面。
这里我们使用 vue 项目来搭建,由于 tui.editor 官方的 vue 组件包装是基于 vue2 的,所以我们不使用它,直接用核心的编辑器就行,它和框架无关。
装完后我们写下如下的 App.vue :
1
2
3
4
5
6
7
8
9
10
11
12
13
14
15
16
17
18
19
20
21
22
23
24
25
26
27
28
| <script setup lang="ts">
import Editor from '@toast-ui/editor'
import '@toast-ui/editor/toastui-editor.css'
import { onMounted, ref } from 'vue'
const editorRef = ref<HTMLDivElement | null>(null)
onMounted(() => {
const editor = new Editor({
el: editorRef.value!,
height: '500px',
initialEditType: 'markdown',
previewStyle: 'vertical',
})
})
</script>
<template>
<div style="display: flex">
<div style="width: 400px; flex-shrink: 0">
<div>toc</div>
<div></div>
</div>
<div style="flex-grow: 1" ref="editorRef"></div>
</div>
</template>
|
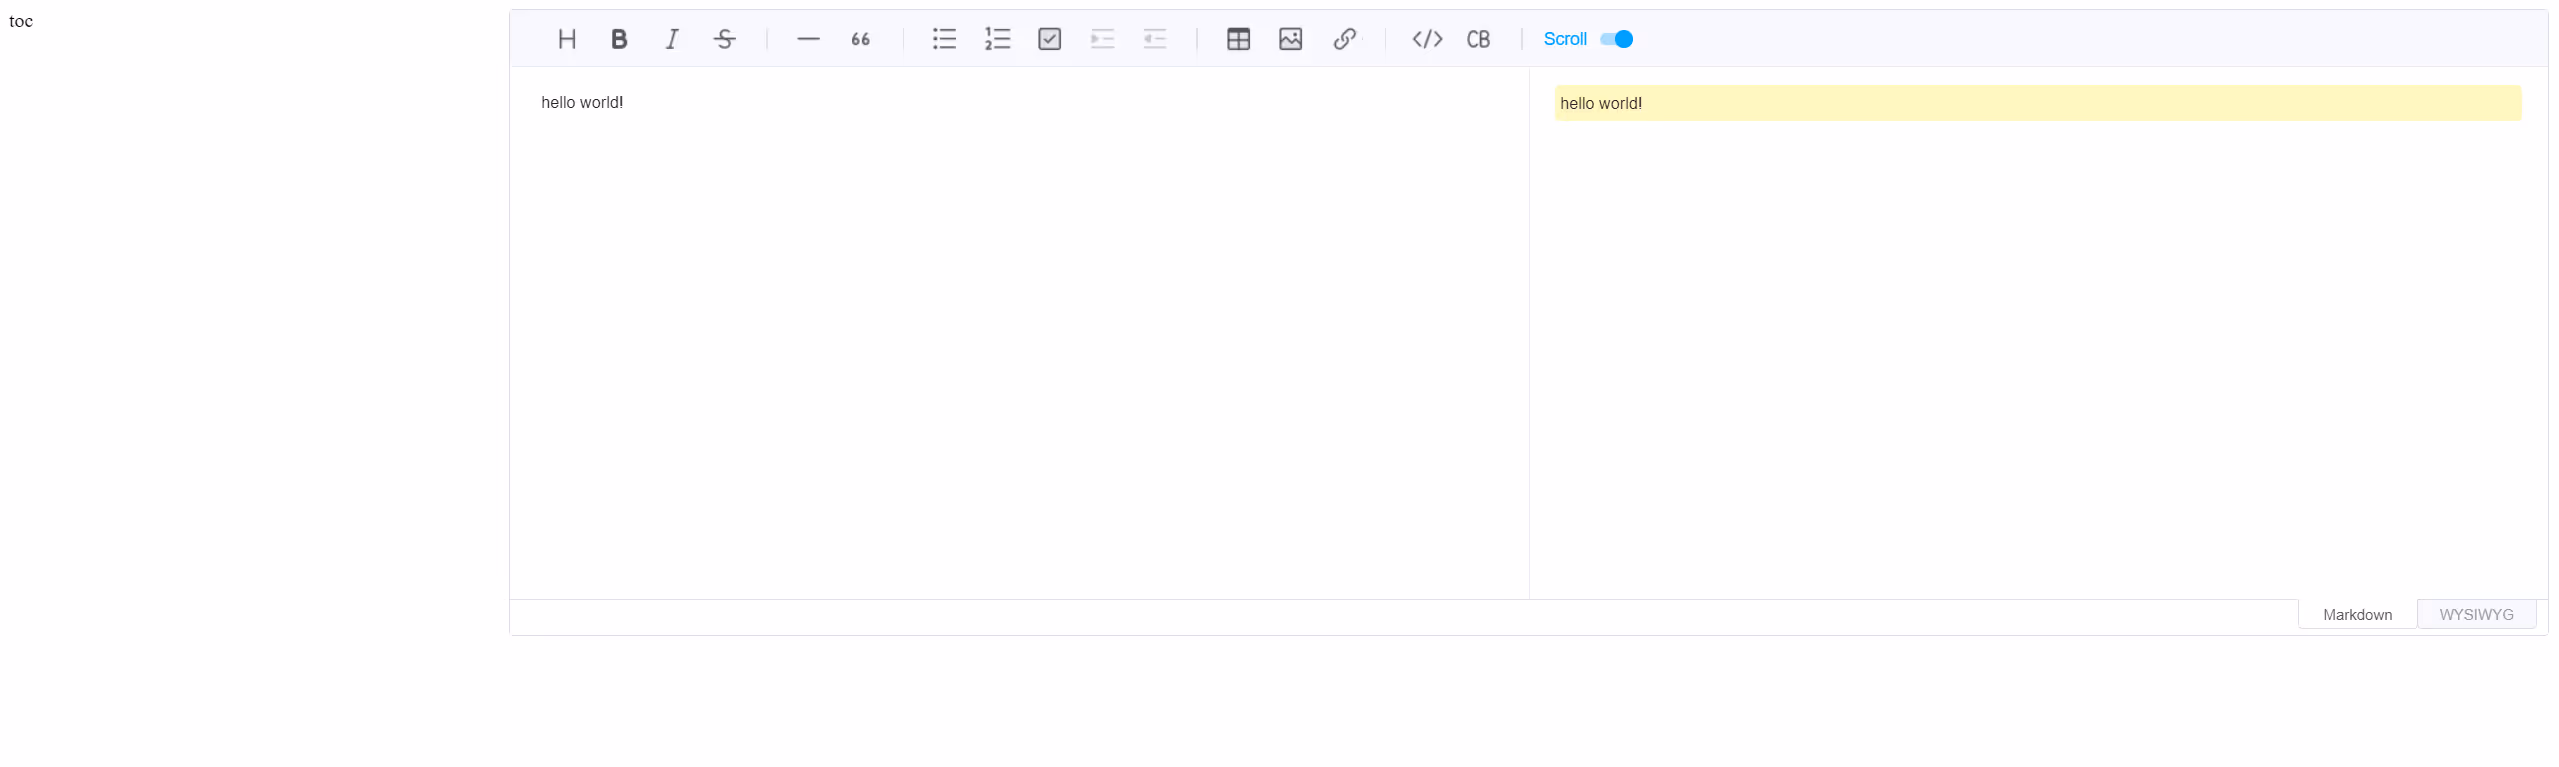
效果图如下:
![]()
左侧是我们要生成的 toc 位置,右边就是我们编辑器的位置。
生成 TOC
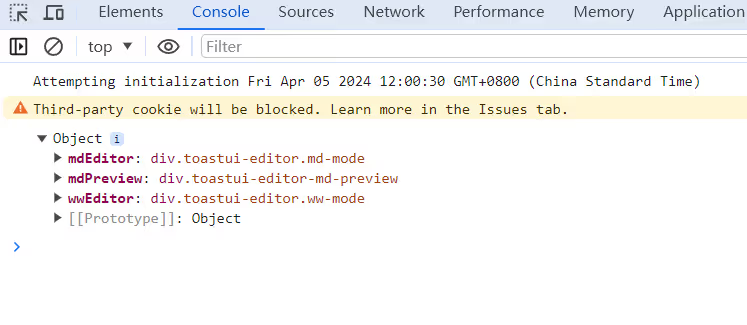
在 tui.editor 的 API 中,有一个 getEditorElements 的方法,它会返回三个 dom ,分别是:
- md 模式下编辑区域的 dom
- md 模式下预览的 dom
- wysiwyg(所见即所得) 模式下编辑区域的 dom
![]()
这里我们以 md 模式来举例。
我们先预设一篇文本,这里用官网的一篇文本:
1
2
3
4
5
6
7
8
9
10
11
12
13
14
15
16
17
18
19
20
21
22
23
24
25
26
27
28
29
30
31
32
33
34
35
36
37
38
| 
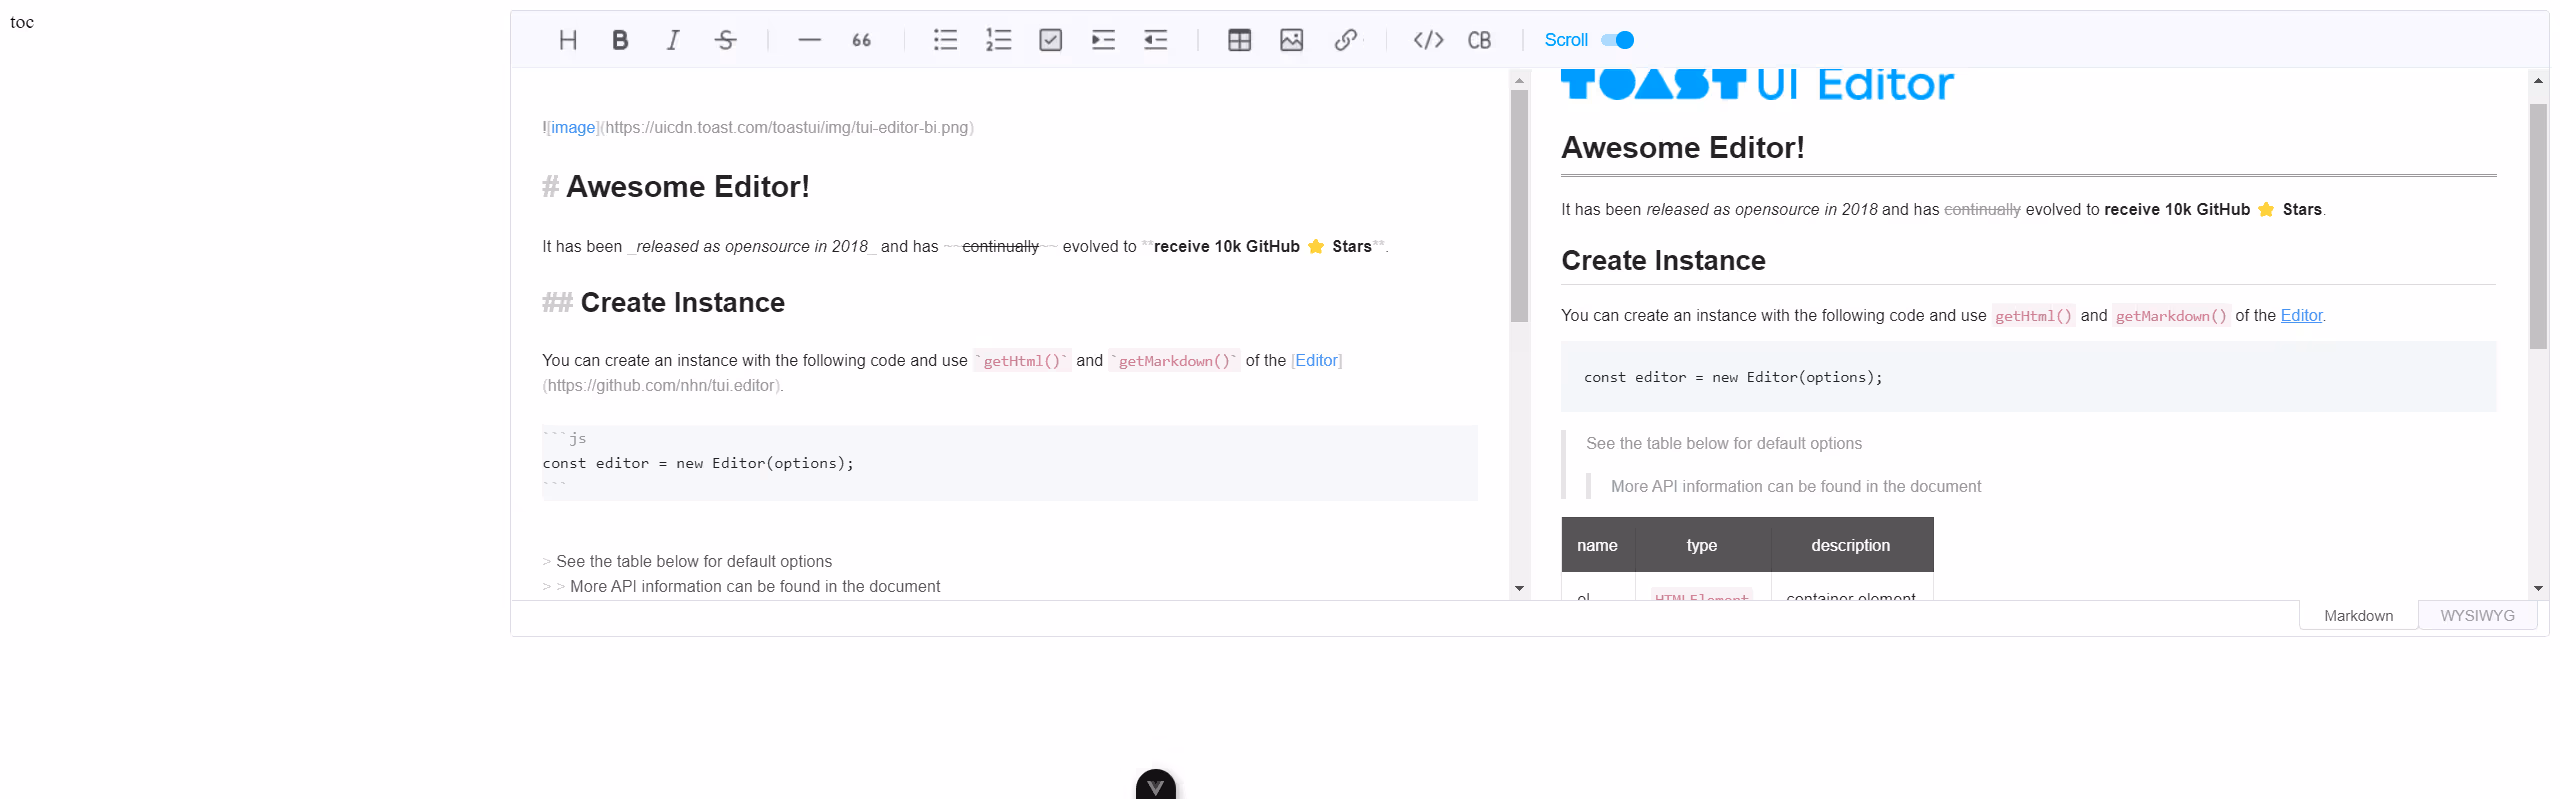
# Awesome Editor!
It has been _released as opensource in 2018_ and has ~~continually~~ evolved to **receive 10k GitHub ⭐️ Stars**.
## Create Instance
You can create an instance with the following code and use `getHtml()` and `getMarkdown()` of the [Editor](https://github.com/nhn/tui.editor).
```js
const editor = new Editor(options)
```
> See the table below for default options
>
> > More API information can be found in the document
| name | type | description |
| ---- | ------------- | ----------------- |
| el | `HTMLElement` | container element |
## Features
- CommonMark + GFM Specifications
- Live Preview
- Scroll Sync
- Auto Indent
- Syntax Highlight
1. Markdown
2. Preview
## Support Wrappers
> - Wrappers
> 1. [x] React
> 2. [x] Vue
> 3. [ ] Ember
|
效果如下:
![]()
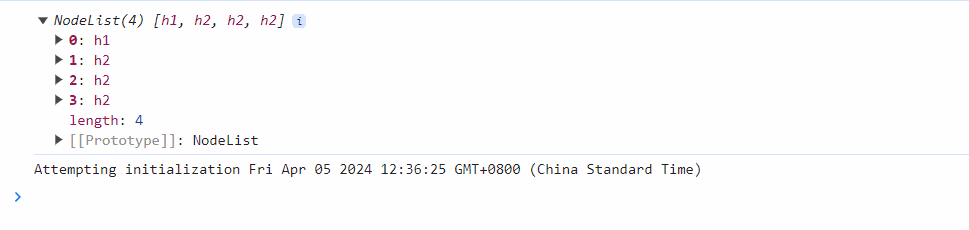
我们先通过 Elements.querySelectorAll 来获取节点下的所有 Heading 标签。
1
2
3
4
|
const { mdPreview } = editor.getEditorElements() as { mdPreview: HTMLDivElement }
const headingList = mdPreview.querySelectorAll<HTMLElement>('h1,h2,h3,h4,h5,h6')
|
效果如下:
![]()
可以看到按顺序显示出了所有的 Heading 标签,这里的按顺序即从代码文本角度看是从上往下的(深度遍历)。
接着我们通过以下的伪代码来说明如何生成 toc :
- 找到一个 heading 标签,此时该标签索引为 index
- 检查 index + 1 索引的标签是否是 index 的子标签
- 如果是的话,则 index + 1 的 Heading 为 index 的 Heading 的 children ,重复第一步
- 如果不是的话,则返回
- 重复第一步
这个算法借鉴了 markdown-toc 库。
写成 js 代码的话如下:
1
2
3
4
5
6
7
8
9
10
11
12
13
14
15
16
17
18
19
20
21
22
23
24
25
26
27
28
29
30
31
32
33
34
35
| type Result = {
level: number
text: string
el: HTMLElement
children: Array<Result>
}
const parseToc = (headingList: Array<HTMLElement>, index: number, parent: Result) => {
while (index < headingList.length && +headingList[index].tagName[1] > parent.level) {
const child = {
level: +headingList[index].tagName[1],
text: headingList[index].textContent ?? '',
el: headingList[index],
children: [],
}
parent.children.push(child)
index = parseToc(headingList, index + 1, child)
}
return index
}
const parseTocTree = (headingList: Array<HTMLElement>): Array<Result> => {
if (headingList.length === 0) {
return []
}
const parent = {
level: 0,
text: '',
el: document.createElement('div'),
children: [],
}
parseToc(headingList, 0, parent)
return parent.children
}
|
接着我们尝试调用这个方法:
1
2
3
| const { mdPreview } = editor.getEditorElements() as { mdPreview: HTMLDivElement }
const headingList = mdPreview.querySelectorAll<HTMLElement>('h1,h2,h3,h4,h5,h6')
const tree = parseTocTree(Array.from(headingList))
|
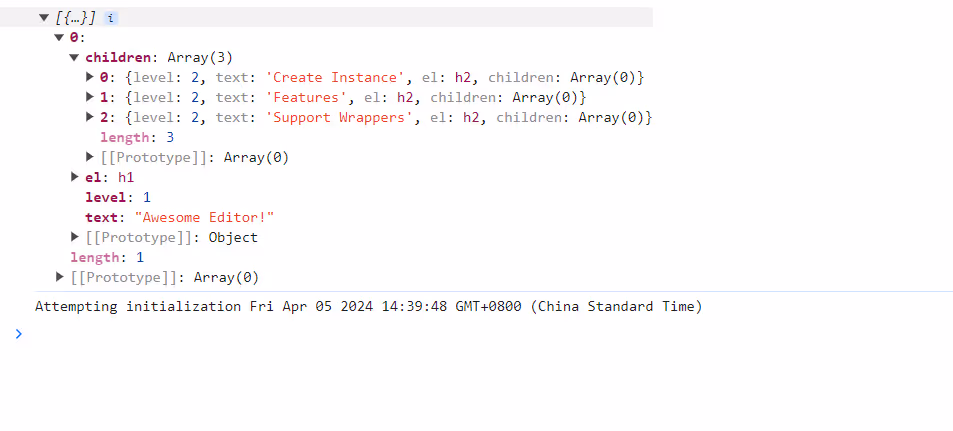
效果如下:
![]()
到这一步之后就很简单了,我们定义一个 TocItem 的组件,然后递归调用即可。
1
2
3
4
5
6
7
8
9
10
11
12
13
14
15
16
17
18
19
20
21
22
23
24
25
26
27
28
29
30
31
32
33
34
35
36
37
38
39
40
41
42
43
| <script setup lang="ts">
import scrollIntoView from 'scroll-into-view-if-needed'
type Item = {
level: number
text: string
el: HTMLElement
children: Array<Item>
}
defineOptions({
name: 'TocItem',
})
const props = defineProps<{
item: Item
}>()
const scrollTo = () => {
scrollIntoView(props.item.el, {
behavior: 'smooth',
})
}
</script>
<template>
<li>
<div class="title" @click="scrollTo">{{ item.text }}</div>
<ol>
<TocItem v-for="(i, index) of item.children" :key="index" :item="i"></TocItem>
</ol>
</li>
</template>
<style scoped>
li {
list-style: none;
}
li .title {
cursor: pointer;
}
</style>
|
这里我们使用了一个 scroll-into-view-if-needed 库,它可以帮我们把元素滚动到可见位置。
然后我们在 App.vue 中引入渲染。
1
2
3
4
5
6
7
8
9
10
11
12
13
14
15
16
17
18
19
20
21
22
23
24
25
26
27
28
29
30
31
32
33
34
35
36
37
38
39
40
41
42
43
44
45
46
47
48
49
50
51
52
53
54
55
56
57
58
59
60
61
62
63
64
65
66
67
68
69
70
71
72
73
74
75
| <script setup lang="ts">
import Editor from '@toast-ui/editor'
import '@toast-ui/editor/toastui-editor.css'
import { onMounted, ref, toRaw } from 'vue'
import TocItem from './TocItem.vue'
const editorRef = ref<HTMLDivElement | null>(null)
const tree = ref<Array<Result>>([])
type Result = {
level: number
text: string
el: HTMLElement
children: Array<Result>
}
const parseToc = (headingList: Array<HTMLElement>, index: number, parent: Result) => {
while (index < headingList.length && +headingList[index].tagName[1] > parent.level) {
const child = {
level: +headingList[index].tagName[1],
text: headingList[index].textContent ?? '',
el: headingList[index],
children: [],
}
parent.children.push(child)
index = parseToc(headingList, index + 1, child)
}
return index
}
const parseTocTree = (headingList: Array<HTMLElement>): Array<Result> => {
if (headingList.length === 0) {
return []
}
const parent = {
level: 0,
text: '',
el: document.createElement('div'),
children: [],
}
parseToc(headingList, 0, parent)
return parent.children
}
onMounted(() => {
const editor = new Editor({
el: editorRef.value!,
height: '800px',
initialValue: ``,
initialEditType: 'markdown',
previewStyle: 'vertical',
events: {
change() {
const { mdPreview } = editor.getEditorElements() as { mdPreview: HTMLDivElement }
const headingList = mdPreview.querySelectorAll<HTMLElement>('h1,h2,h3,h4,h5,h6')
tree.value = parseTocTree(Array.from(headingList))
},
},
})
})
</script>
<template>
<div style="display: flex">
<div style="width: 400px; flex-shrink: 0">
<div>toc</div>
<ul>
<TocItem v-for="(item, index) of tree" :key="index" :item="item"></TocItem>
</ul>
</div>
<div style="flex-grow: 1" ref="editorRef"></div>
</div>
</template>
|
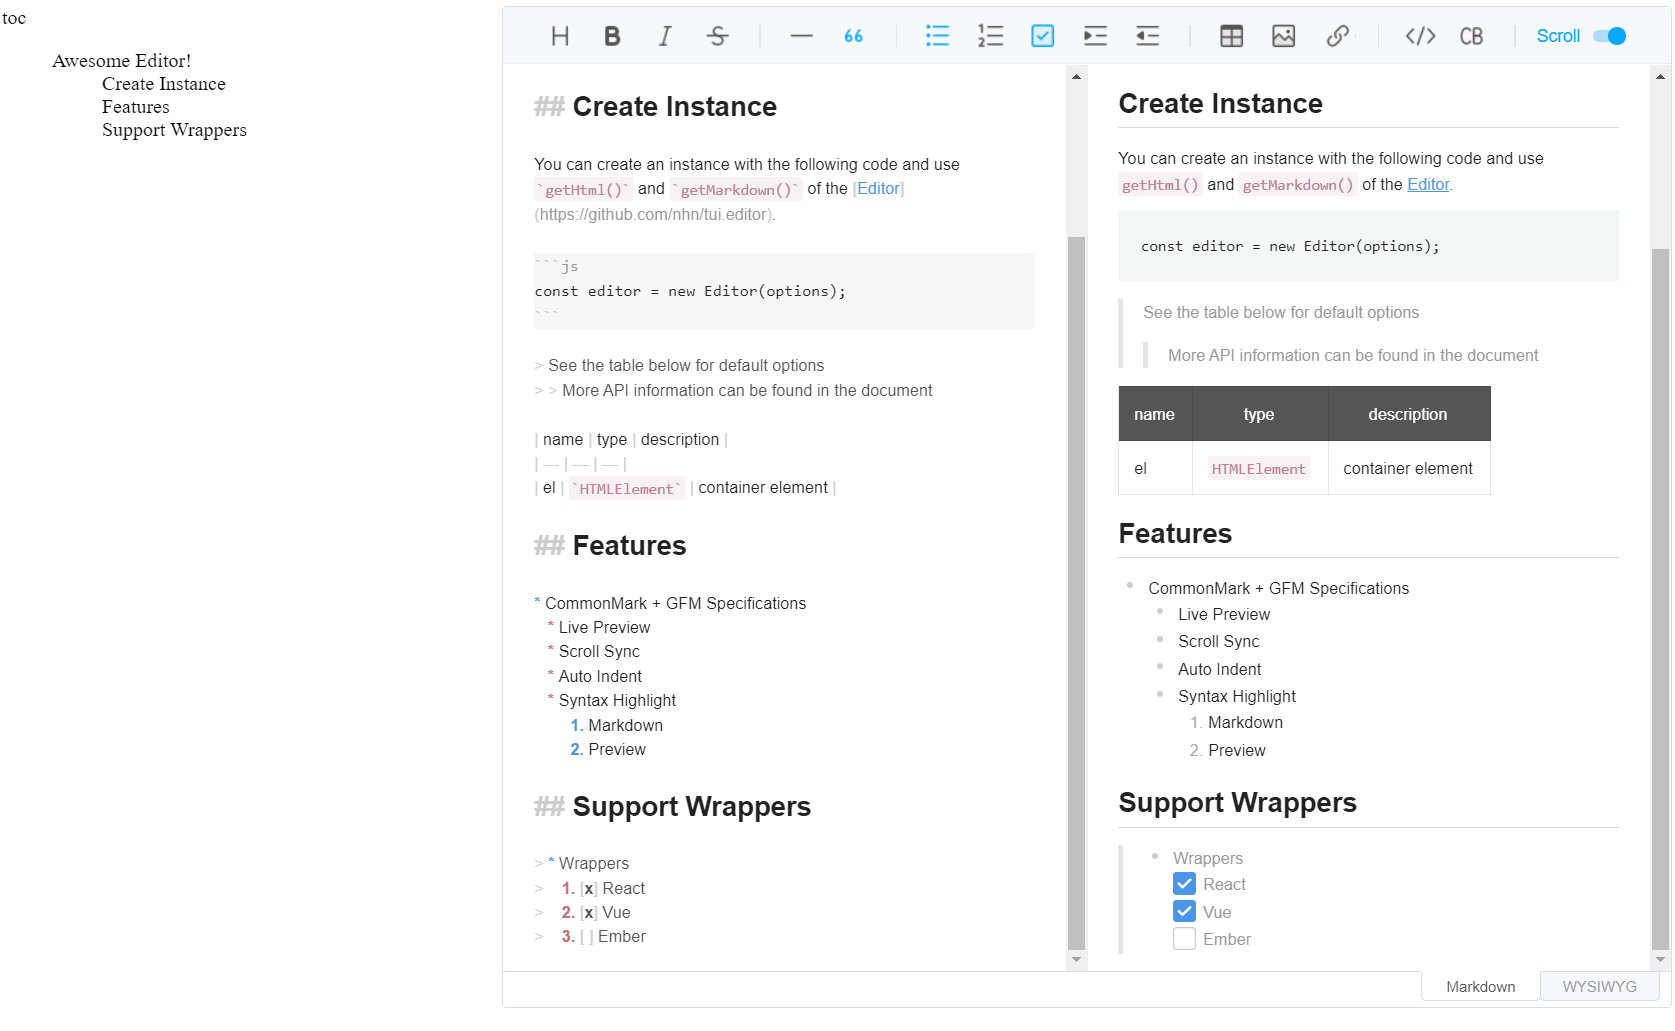
最后我们来看一下效果:
![]()
后记
刚开始的时候说实话很蠢,一直在想我得修改 markdown 编辑器的渲染过程,让每个 h1 加上 id ,然后我通过 id 来获取元素进行定位。
后面转念一想,我都用 querySelectorAll ,为啥还要 id 。
这个脑子🧠有时候就是不太好用。